Let’s be real: your gaming setup looks a little too much like a boring office cubicle and not enough like a high-score screen from 1984. You want that sweet, synthwave glow, but traditional glass blowing is a one-way ticket to a fail compilation video. Luckily, making diy neon signs has evolved from a dangerous science experiment into a total breeze thanks to LED flex technology.
Forget about high-voltage shocks or shattering expensive glass tubes like a clumsy movie villain. These modern LED strips are basically the easy mode of home decor, they’re cheaper, safer, and won’t hike up your power bill while you’re grinding for XP. You get all the retro, Cyberpunk vibes with none of the actual fire hazards. It’s time to level up your room aesthetic without needing a professional trade certificate.
If you are trying to capture that perfect synthwave aesthetic for your gaming setup, you might be tempted to hunt down a vintage glass neon sign. However, unless you want to deal with high-voltage transformers and the constant fear of a stray controller toss shattering your decor, traditional glass is a total nightmare. Old school neon tubes are incredibly fragile, run hot enough to cook an egg, and require a professional glassblower just to make a simple curve. It is a high-stakes game where one wrong move means toxic gas and a very expensive mess on your floor. For a DIY hero on a budget, these buzzing glass relics are basically the final boss of home decor.
Modern LED flex technology is the ultimate cheat code for creators who want the glow without the literal meltdown. These flexible silicone strips are packed with tiny lights that stay cool to the touch even after a twelve-hour streaming session. You can bend, cut, and glue them into any shape your heart desires without worrying about electric shocks or chemical leaks. They run on low voltage, which means they are way safer for your bedroom and significantly cheaper on your monthly power bill. It is the perfect way to get that retro 80s vibe while keeping things lightweight and shatterproof.
Customizing your space with LED strips is as easy as following a quest marker in your favorite RPG. You can swap colors or dim the brightness with a simple remote, giving you total control over your room’s atmosphere. Since the material is so durable, you can mount your custom creations on cheap acrylic or wood without needing a degree in electrical engineering. It is all about getting that high-end look for a fraction of the price while keeping your DIY process completely stress-free. Your walls will look like a scene straight out of a cyberpunk movie, and your wallet will definitely thank you for choosing the smarter, safer tech.

Every legendary gaming setup starts with a solid plan, so grab your favorite meme or gamer tag and get ready to bring it to life. You do not need to be a professional artist to pull this off, as printing a simple template from your computer is the ultimate cheat code. Lay your design underneath a clear acrylic sheet or on top of a smooth wooden board to act as your roadmap. This backing serves as the skeleton of your sign, providing the structure needed to hold those vibrant LED curves in place. Once your template is taped down, you can visualize exactly where your glowing lines will flow before you even touch a single piece of hardware.
Choosing the right base is all about matching your room’s aesthetic while keeping things practical and sturdy. Acrylic sheets are the go-to choice for that classic floating look, making it seem like your neon art is hovering right against your wall. If you are going for a more rustic or industrial vibe, a dark stained piece of plywood can make those neon colors pop with an extra punch of contrast. Since we are using modern LED neon flex instead of fragile glass, you can easily drill small holes or use clear adhesive clips to secure your tubing. This setup is way safer and more forgiving than old-school neon, so you can focus on the fun part without worrying about high-voltage mishaps.
Before you commit to the glue, take a moment to trace your path and ensure your design is actually doable with flexible tubing. LED neon rope is incredibly bendy, but it still has its limits when it comes to those super tight corners or tiny cursive loops. If your tag has a tricky spot, you might need to adjust your template slightly to keep the light flowing smoothly without any awkward kinks. Think of this stage like sketching out a level map before you start the boss fight. Getting your backing and template perfectly aligned now means you will have a much smoother experience when it is time to flip the switch and bask in that glorious synthwave glow.
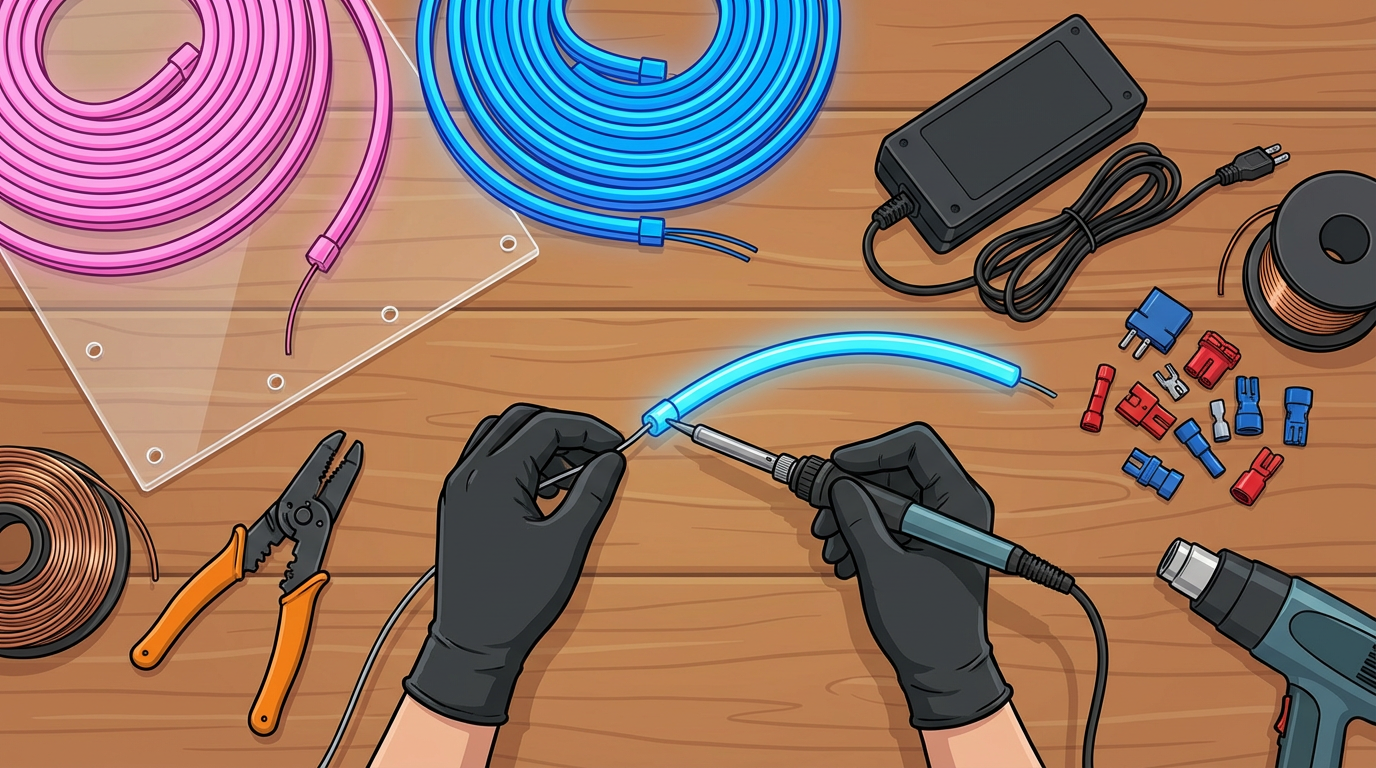
Transforming a spool of LED neon rope into a glowing masterpiece is surprisingly easy even if you are more used to a controller than a soldering iron. You will start by sketching your design onto an acrylic backing or a piece of wood to act as your roadmap. Once your path is set, simply bend the flexible silicone tubing to follow the lines of your custom font or geometric shape. If the rope feels a bit stubborn, just remember that you are the boss of this retro aesthetic. Use small drops of clear adhesive or mounting clips to keep those curves tight and professional looking.
Cutting your LED strips is the next step, but you have to keep an eye out for the designated cut marks usually indicated by small black lines or scissor icons. Making a clean snip at these specific points ensures you do not kill the circuit and leave your sign in total darkness. After cutting, you can bridge the gaps between letters using small jumper wires to keep the power flowing through the entire design. It feels a bit like a real life puzzle game where the reward is a glorious neon glow. You do not need to be a professional electrician to master this part of the process.
Connecting the power supply is the final boss battle of your DIY journey, but it is actually quite low stakes thanks to low-voltage nature technology. You can choose between quick clip on connectors for a tool free experience or a tiny bit of solder for a more permanent bond. Once your wires are attached to the power adapter, you can finally flip the switch and bask in that sweet synthwave ambiance. It is a massive upgrade for your gaming setup that looks like a million bucks without draining your bank account. Your room will finally have that high end aesthetic you have been dreaming about.

Once your LED neon flex is glowing and your design is looking sharp, it is time to give it a permanent home on your wall. Since these DIY signs are much lighter than old school glass tubes, you do not need heavy duty construction equipment to get the job done. Clear command hooks or small acrylic standoffs are your best friends here because they keep the focus on the glow rather than the hardware. Positioning your sign at eye level or slightly above your gaming monitor creates that immersive cyberpunk vibe that makes your room feel like a futuristic high roller suite. Just make sure you are not blocking any important airflow for your PC while you are chasing those aesthetic goals.
The biggest vibe killer in any high tech setup is a bunch of messy black cables dangling like techno spaghetti from your beautiful art. You can achieve a professional look by using paintable cord covers that blend right into your wall or by tucking the thin wires behind furniture. If you are feeling extra fancy, try routing the power cord through a small hole in the wall to make the sign look like it is floating in mid air. Since LED neon runs on low voltage, you do not have to worry about the heat issues that come with traditional glass neon signs. Keeping your workspace clean and wire free is the secret sauce to making your budget friendly project look like a premium collector piece.
Choosing the right backdrop can take your glowing masterpiece from a simple hobby project to a legendary centerpiece. Darker walls or textured surfaces like faux brick or acoustic foam panels really make those vibrant synthwave colors pop against the shadows. You want to avoid placing your sign directly opposite a window where the afternoon sun will wash out all that glorious neon goodness. Think about how the light reflects off your desk or keyboard to create a cohesive color story for your entire gaming station. When the sun goes down and you flip that switch, your room will transform into a vaporwave room drenched sanctuary that would make any 80s movie villain jealous.
Building your own custom lighting is the ultimate level up for any gaming setup or retro inspired sanctuary. You have successfully handled the LED flex and silicone tubing without having to deal with the high voltage drama of old school glass tubes. It is officially time to kill the overhead lights and let that vibrant glow wash over your room like a synthwave dream. Your space now has that premium aesthetic that usually costs a fortune, but you pulled it off on a budget with your own two hands. Take a second to appreciate the crisp lines and the way the colors pop against your wall.
The transformation from a boring bedroom to a neon underworld is complete and your new sign is the literal crown jewel. You have traded the headache of professional glassblowing for the simplicity of low voltage power and flexible materials that actually stay cool to the touch. This project proves that you do not need a massive bank account to revamp your space and create a vibe that looks straight out of a futuristic arcade. Whether you are streaming to an audience or just chilling in your own private oasis, this light is a permanent reminder of your creative skills. Now just sit back, grab a snack, and bask in the glorious radiance of your hard work.